Create a TABSTRIP in Module Pool Programming to Display Data
SAP ABAP Interview Questions – Real Time
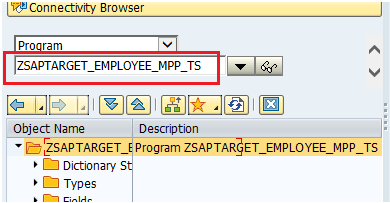
Step 1: Go to SE80, select “Program” from the dropdown list and enter the name of the Module Pool Programming.
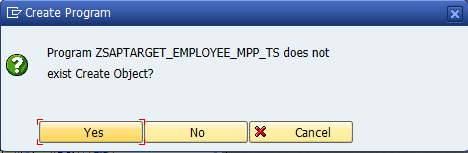
Step 2: A pop-up will rise and ask you to create it. Click on Yes.
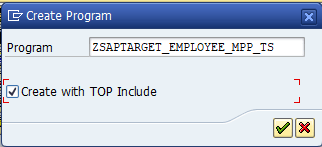
Step 3: Another Pop will come out to ask you to enter the name of the module pool program. Click on the “Create with TOP Include” checkbox and click on the tick button.
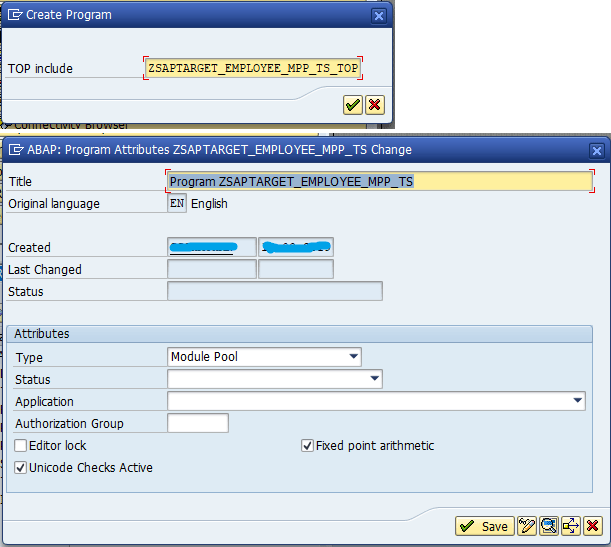
Step 4: Now enter the name of the TOP Include and continue saving it as a module pool program.
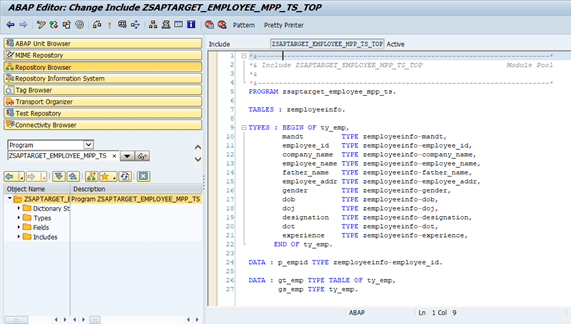
Step 5: Now double click on “Include ********_TOP “ on the screen, create it and write the following code.
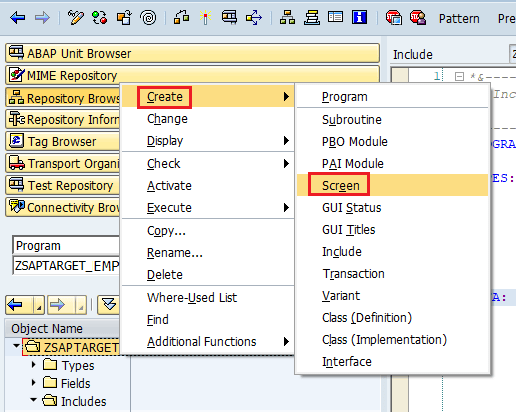
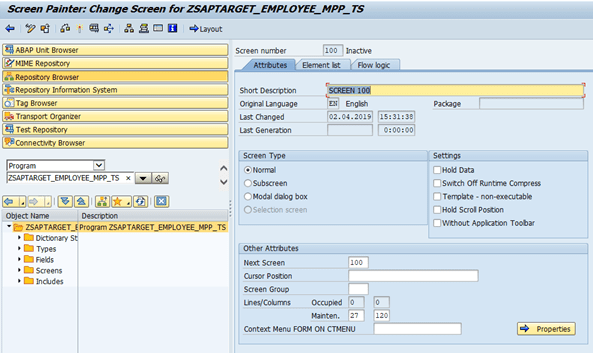
Step 6: Now right-click on the Program name and create a screen.
Step 7: Write Screen Number “100” and a short description.
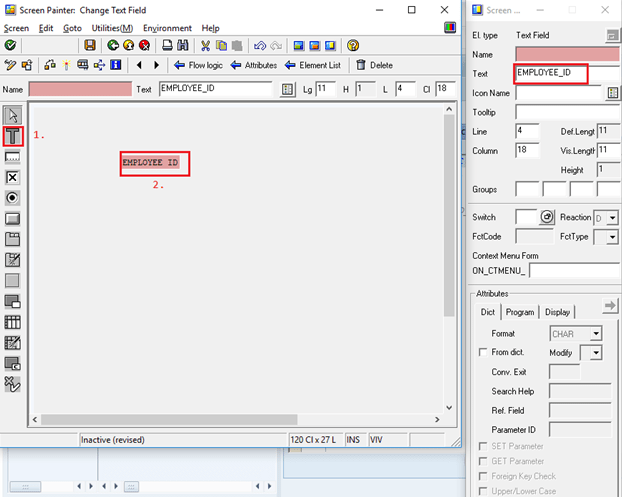
Step 8: Now select the Text element from the left element’s box and write the text.
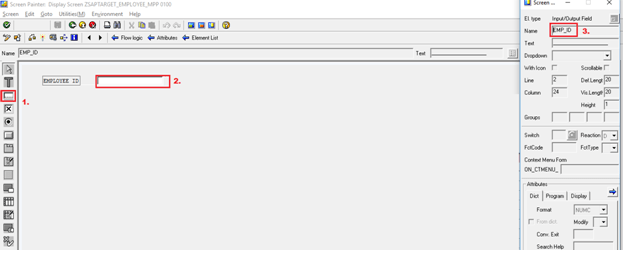
Step 9: Create an input box by selecting the “input box” from the left toolbox and placing it anywhere on the screen. Name that input box as “P_EMPID”.
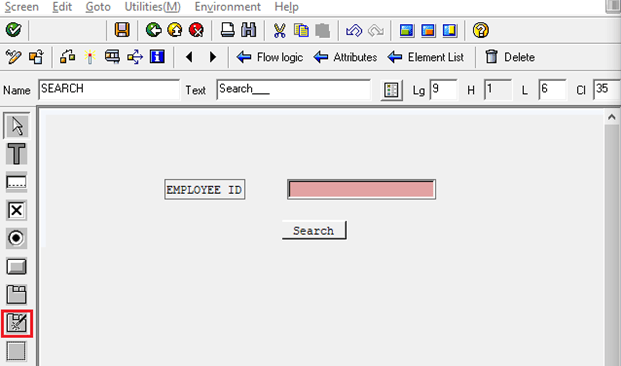
Step 10: Create a button by choosing “Pushbutton” from the left Elements list as shown below. Then double click on it and put the following settings.

Step 11: Now click on the button “Tab Strip Control Wizard” from the left Toolbox as shown.
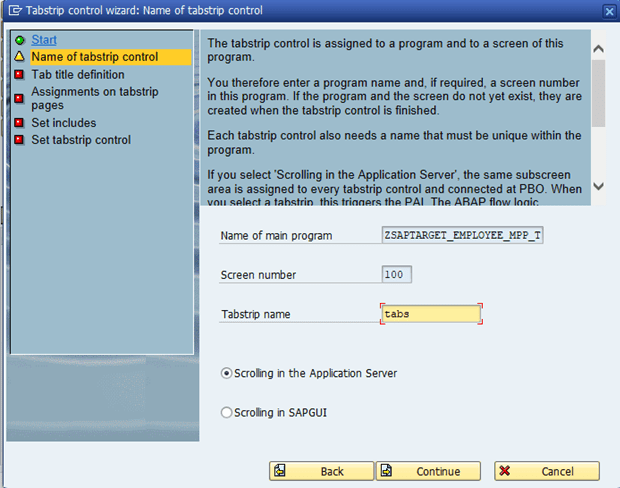
Step 12: A wizard window will appear. Enter the name of the tab strip. Click on Continue.
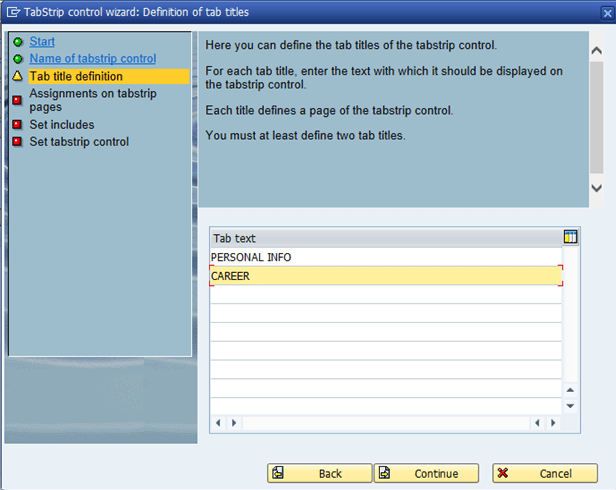
Step 13: Now enter the heading of the tabs you want to display. Click on Continue.
Step 14: Enter the Screen number of the respective tab strip and Function Code also. Click on Continue.

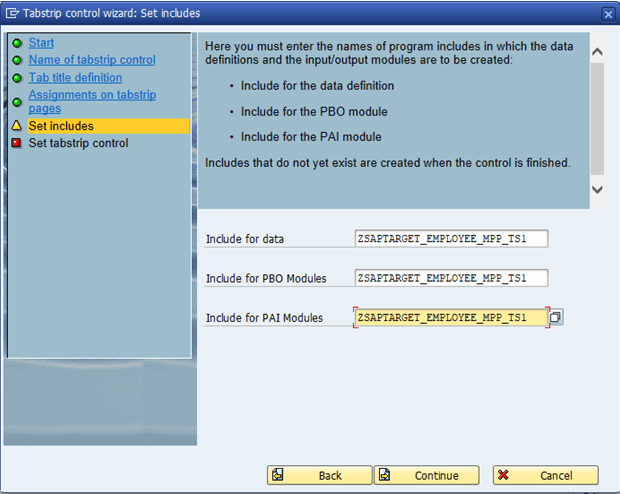
Step 15: Now write the name of the includes as shown below. Click on Continue.
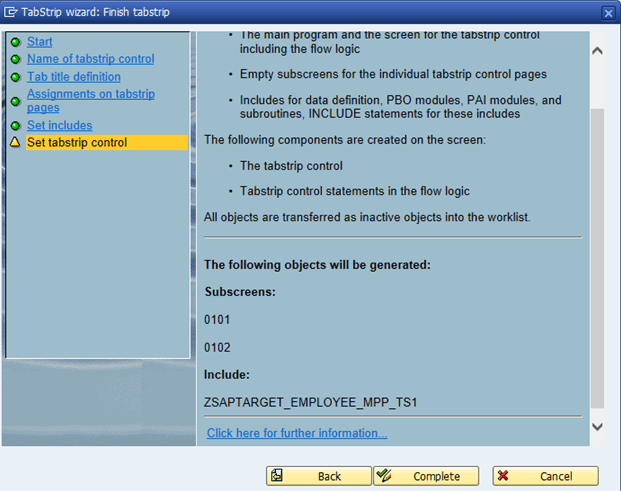
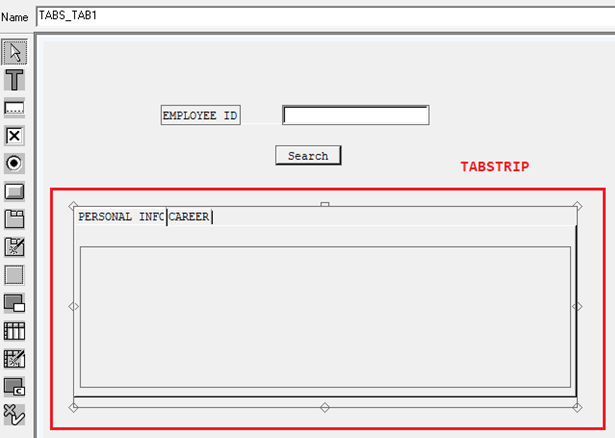
Step 16: At last click on the “Complete” button, as the process is complete and there will be a tab strip with respective screen area and headings.
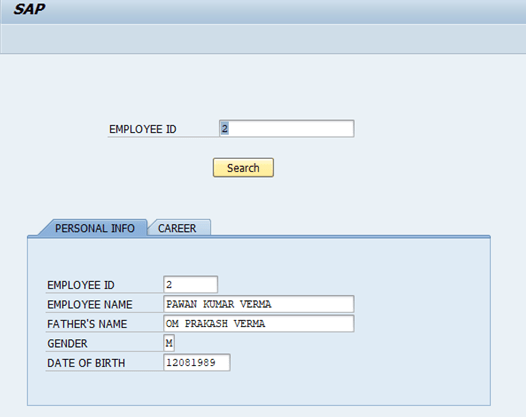
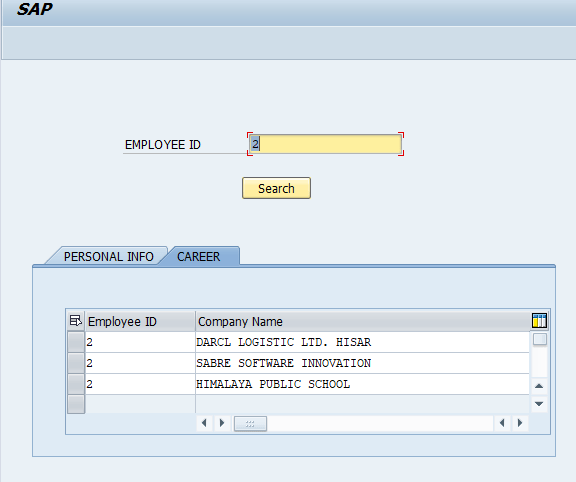
Step 17: Now the screen will look like shown below. Two tabs are created with “Personal info” and “Career” as their headings respectively.
Step 18: Now click on the Flow logic button and uncomment both the modules “STATUS_0100” and “USER_COMMAND_0100”.
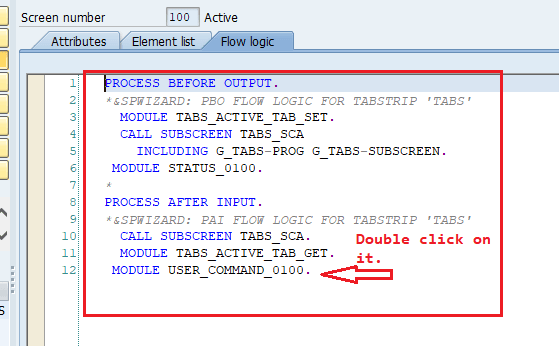
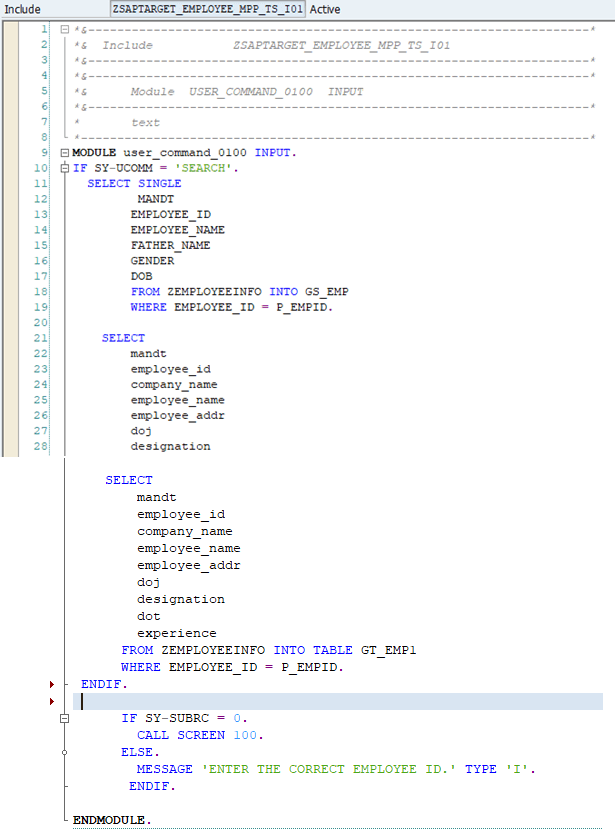
Step 19: Now double click on module “USER_COMMAND_0100” and write down the following code
:
Code:
IF SY-UCOMM = ‘SEARCH’.
SELECT SINGLE
MANDT
EMPLOYEE_ID
EMPLOYEE_NAME
FATHER_NAME
GENDER
DOB
FROM ZEMPLOYEEINFO INTO GS_EMP
WHERE EMPLOYEE_ID = P_EMPID.
SELECT
mandt
employee_id
company_name
employee_name
employee_addr
doj
designation
dot
experience
FROM ZEMPLOYEEINFO INTO TABLE GT_EMP1
WHERE EMPLOYEE_ID = P_EMPID.
ENDIF.
IF SY-SUBRC = 0.
CALL SCREEN 100.
ELSE.
MESSAGE ‘ENTER THE CORRECT EMPLOYEE ID.’ TYPE ‘I’.
ENDIF.
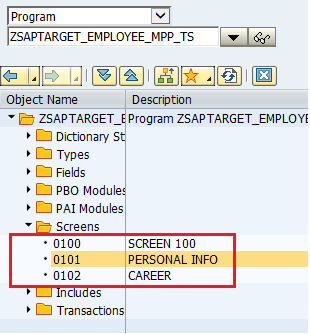
Step 20: Now if you will see in the “SCREEN” folder there are two more screens created automatically while creating tab strips. These screens are of that two tabs with the heading “Personal Info.” Screen-0101 and “Career” has screen-0102 respectively. On these screens whatever you will create it will be shown under respective tabs.
Step 21: Now we will create a single line record in screen-0101 as shown below(click here to see: how to create a single line record.)
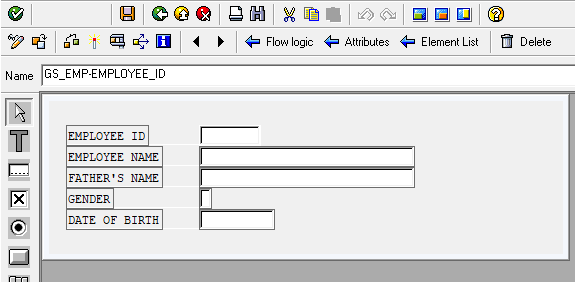
Now save and activate it.
Step 22: Now in screen-0102 we will create multiple line data or a table as shown below. (click here: how to create a multiple-line data or table ).
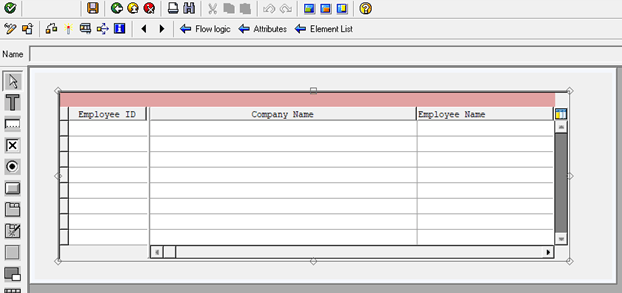
Now save and activate it.
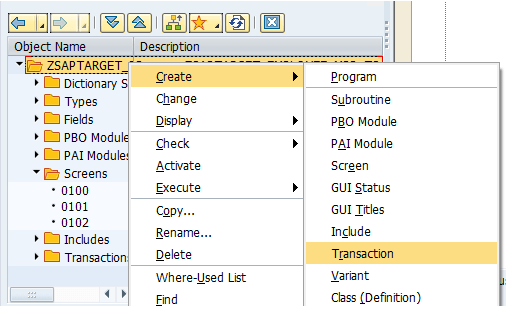
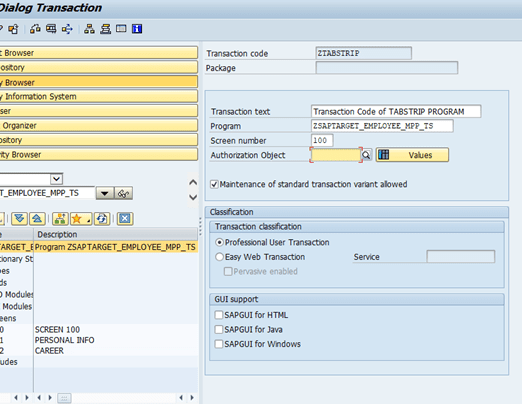
Step 23: Now right-click on the program name and create-> transaction.
Step 24: Enter the name of the Transaction code and a short description. Select the radio button “Program and screen (dialog transaction)”.
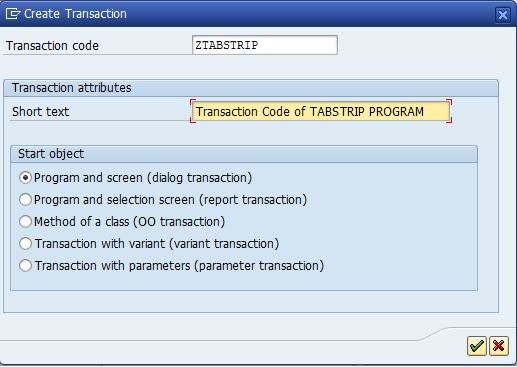
Step 25: Now enter the screen number of that screen which you want to see first when you run your transaction code, here in our case we are adding screen number 100.
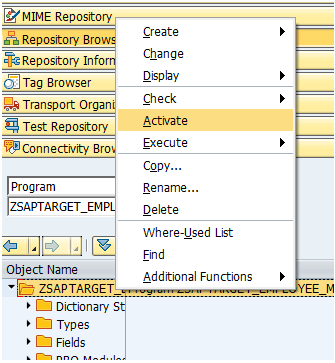
Step 26: Now save and activate the whole program by right-clicking on the program name and clicking on the “Activate button”.
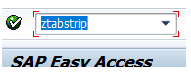
Step 27: Now run the transaction code in the transaction box.
OUTPUT